FXCM Desktop Settings for Layout, Marketscope and Charts for Forex trading ;
Step 1: Download FXCM Desktop application from FXCM Desktop App download
Step 2: Install the application
Step 3: Login into your account : ‘Real’ or ‘Demo paper account’Step 4: Layout and settings:
This is probably what desktop application would look like! However this is not much of use for ‘Forex Trading’ , but good as fancy screen saver. So remove ‘Advance Dealing Rates’ and ‘Simple Dealing Rates’ tabs, we don’t need these.
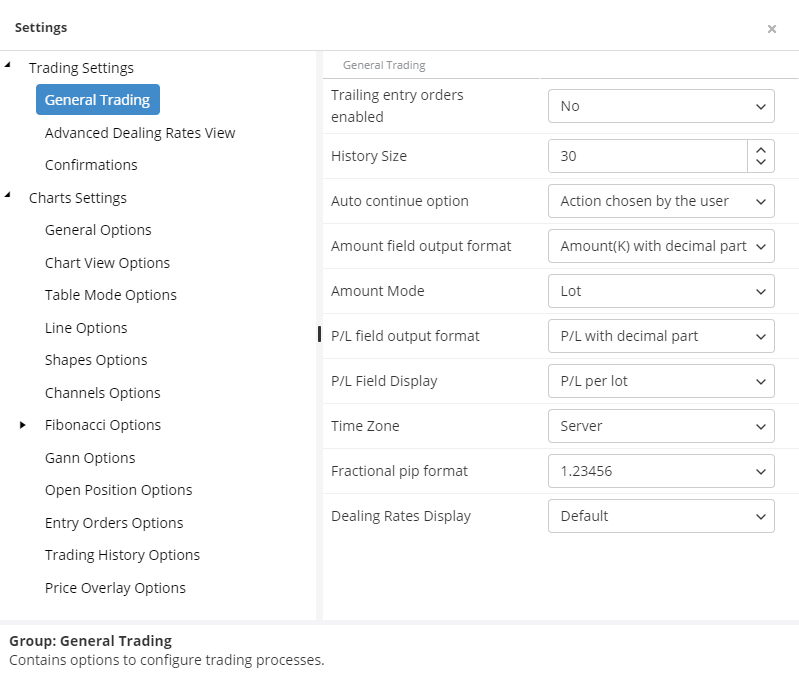
Lets make some changes that fit the need of a professional trader. Go to System ->Options -> Trading Settings -> General Trading

Important ‘General Trading’ and ‘Chart View options’ settings:
General trading:
- Fractional pip formatting = 1.2345[6] ‘this allows four decimals points’
Chart View options:
- Time Zone : Local
- Default font and color
- Show grids: no
- Tool time out:20 to 30 seconds.
Time zone options: Change the Time Zone on your charts by Clicking on System -> Options -> General Trading and In the Time Zone option, choose the Time Zone you want for your platform.
UTC = GMT
Server = EST
Local = Time on your local computer
Financial = EST
Symbols and Symbols List window is used to add and remove the Currency Pairs. access this window by View->Symbols List
A user can use maximum of 20 out of total 39 ‘active symbols’ will be displayed in bold, blue letters at a time can be traded. Other ‘inactive symbols’ in ‘plain black font’ can not be displayed on a chart. To use inactive symbols just double click to to ‘Add or Remove’ it.You can email admin@fxcm.com to request that the 20-symbol limit on your Trading Station be removed. You can then use the Symbol Subscription List to select which currency pairs to display. For slower computers if you have all symbols listed on the screen then your RAM will be overloaded.
By default, charts will open in a new window or be added to an existing Marketscope window. If you wish to have Marketwatch open in Trading Station instead of a separate screen, you can go to System->Options->General Options -> Marketscope 2.0 and Change the Create Chart Logic, Create
View Logic, and Open Chart Logic.
Adding an EMA or other indicator:
Right click on the chart and selecting ‘Add Indicator’
Parameters: settings for calculation, appearance, and style.
Data Source: can be ‘Close price’, or the ‘final price of a period’. ‘Close’ is set as by default.
Location: the indicator can be displayed on chart itself, in a separate area below the chart, as well as on other indicators.
Set up text alerts in Trading Station: Click on “System” -> “Options”->“Marketscope 2.0” ->“Strategies Options”
In the field “SMTP server address” enter your SMTP server address Add :465 to the end of your SMTP server address (smtp.gmail.com:465, smtp.live.com:587, smtp.mail.yahoo.com:465)
In the field “SMTP user” enter your email username – the one you use to login to your email
In the field “SMTP password” enter your email password – the one you use to login to your email
In the field “From address” enter your email address
In the field “Default email address” enter your carrier’s SMS gateway If you do not know the SMS gateway, please check your phone carriers website or contact their customer support. You may also be able to obtain the information from third party sites similar to the following links: (1,2)
After you set up these windows the way you want them, you can save the set up by going to View->Profiles->Save Profile. Enter the name of your new layout and click “OK” to save changes.
When you reopen the platform, just open the organized preferred charts set profile you saved above to access set of charts and all chart elements: “Indicators, Trend lines, Fibonacci retracements, etc”.
Placing Forex Orders
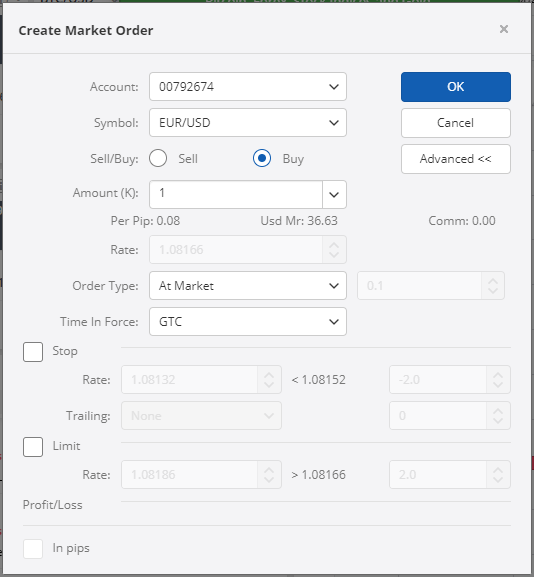
- Select the Forex tab on the Order Bar to reveal the Forex order section.
- Enter the Forex currency pair symbol to place an order in the Currency Pair box.
- Click the or arrow to select the number of currency units to trade in the Units box.
- Select the desired order type (Limit, Market, Stop Limit, Stop Market) from the Order Type drop-down list.
- For limit orders, set the limit price to adjust the price using the or arrow in the Limit Price box. You can also click Auto to use the Auto Price feature.
- For stop orders, set the stop price to adjust the price using the or arrow in the Stop Price box.
- Select the length of time for which you want your order to be valid from the Duration drop-down list. For more information, see Order Bar Durations for Forex.
- Select the account to use in settlement of your order from the Account No. drop-down list.
- Click Buy to purchase currency units or click Sell to short currency units from your position.
- Click OCO/OSO for Order Cancels Order or Order Sends Order choices.
- Click Yes to send the order or No to cancel the order in the Confirm dialog.
Leave a Reply