Trading System
The ultimate goal of this project is to run a fully automated trading system. This makes ‘Algorithmic Trading with Machine Learning’ a sub-goal and comes before ‘building an automated trading system. various components of the system. Since I’m learning this, it would seem to make sense to set down to outline each and every step I take in this journey. A trading system is made with:
- An operating system (I chose Windows 11)
- Required apps/packages (SSH, TightVNC to remote access server, GIT to download from GitHub)
- NAS storage
- The Interactive Brokers: TWS and Gateway
- Interactive Brokers – API Software (TWS API stable for Windows last 9.76)
- GIT for Windows: https://git-scm.com/download/win. Download installer
- Python and Python libraries related to this project
- Non-python package dependencies
- The directory structure for data
- Historical data for testing
Technology stack
The physical stack/Hardware:
Cable & wireless router, 8 port switch, cable modem, QNAP NAS server with RAID, Backup drive, HP EliteDesk Primary trading server, Secondary trading PC
HP EliteDesk G3 (the year 2019) MINI PC Desktop Computer, Intel Quad-Core i5-7500 2.7GHz, 8GB DDR4 RAM, 256GB SSD, Windows 10 Professional
For backup local NAS 16TB and for redundancy parallel system for failover. NAS automatically backs up data. NAS is programmed to back up nightly on a connected USB drive. In my risk management plan, I want to back up my data on a USB stick and keep it safe, remote.
I run my code on both primary PC, the second PC machine is mostly passive (ready to go and running in parallel).
Software: Windows vs Unix? My choice is Windows 10 (now upgraded to win11)
Criteria:
- cost
- speed
- flexibility
- degree of difficulty
- robustness and redundancy
- ease of automation
Broker: Interactive brokers, since I am located in Canada, IB is the one with the decent commission and fee structure with API to connect with the trading server.
Gateway vs TWS: Gateway. It is lightweight and fast because it only service API requests and I can leave the session running. I do my own trades, so I use TWS on my main (primary) PC that runs a full-featured front-end TWS.
Data feed: Interactive brokers live trading, trading.com, and barchart.com for historic data
Programming language: Python and Google Sheets (with GAS)
- Python – The core programming environment for the project
- Anaconda (create nucleus account to access via web)
- Conda (Anaconda comes with Conda package manager to install, upgrade and uninstall all your Python libraries, and create and manage your virtual environments)
- Jupyter Notebooks.
API access method: ibinsync
Storage/ DBMS methodology: mongoDB, Yaml
Step 1: Setting Up Your Environment
Objective
Set up for programming environment for our project. This includes a Python environment with libraries. Run a quick test for installation.
We will download data to build an ML model and a trading strategy.
- Prepare work client host windows with Configuring SSH Service on Windows 10 and 11 (admin privilege needed). You can use the following command in Terminal Windows:
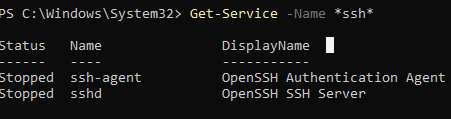
- Add-WindowsCapability -Online -Name OpenSSH.Server* Or using DISM: dism /Online /Add-Capability /CapabilityName:OpenSSH.Server~~~~0.0.1.0 Configure SSH: (check pic 01 below)As you can see, both services are in a Stopped state and not added to the automatic startup list. To start services and configure AutoStart for them, run the following commands:>Start-Service sshd >Set-Service -Name sshd -StartupType ‘Automatic’
>Start-Service ‘ssh-agent’
>Set-Service -Name ‘ssh-agent’ -StartupType ‘Automatic’ If the start service ‘ssh-agen’ throw an error then run it after start automaticallyAllow incoming connections to TCP port 22 in the Win Defender Firewall. open the port using netsh:
- New-NetFirewallRule -Name sshd -DisplayName ‘OpenSSH Server (sshd)’ -Enabled True -Direction Inbound -Protocol TCP -Action Allow -LocalPort 22
- Force open Powershell
- New-ItemProperty -Path “HKLM:\SOFTWARE\OpenSSH” -Name DefaultShell -Value “C:\Windows\System32\WindowsPowerShell\v1.0\powershell.exe” -PropertyType String -Force
- Connect from client windows: > ssh -p 22 admin@192.168.1.90
- Add-WindowsCapability -Online -Name OpenSSH.Server* Or using DISM: dism /Online /Add-Capability /CapabilityName:OpenSSH.Server~~~~0.0.1.0 Configure SSH: (check pic 01 below)As you can see, both services are in a Stopped state and not added to the automatic startup list. To start services and configure AutoStart for them, run the following commands:>Start-Service sshd >Set-Service -Name sshd -StartupType ‘Automatic’
- Setup trading account with IB and Subscribe to market data. IB is willing to show you free delayed data (15 minutes for US Stocks, for example) and historical data in the TWS GUI, but if you want to access real-tick data using the API, you will require a market data subscription. For the purposes of this tutorial, you could choose to subscribe to only one exchange for US stocks, such as NASDAQ, for $1.50/month at the time of writing.
- Interactive Brokers – API Software (TWS API stable for Windows last 9.76). You can run either the full Trader Workstation GUI (TWS), or a slightly smaller Gateway that is only used for API access. I am using TWS in this project.
- GIT for Windows: https://git-scm.com/download/win. Download the installer and install GIT, after installation open Git Bash -> and check
- git config -hSet your identity with these commands:
- >git config –global user.name “John Doe”>git config –global user.email johndoe@example.com
- Open Windows Terminal or Power Shell, Type python into the prompt and press enter. You get a version of Python followed by three chevrons (>>>), the Python prompt to enter Python commands. You are now in a Python console and can begin coding in Python. try and type:> python –version
- Create a Virtual Environment > conda create -n py3.8 python=3.8activate environment> conda activate py3.8
- IB-insync High-level interface to Interactive Brokers. Library to link TWS
- >pip install ib_insync
- >pip install dataclasses
- pysystemtrade : pysystem trade is the open-source back testing. This package is installed with git: git clone https://github.com/robcarver17/pysystemtrade.git
- (Optional) Download IBController zip file -> Install IBController (default installation folder)
- git config -hSet your identity with these commands:
- Install required libraries within Anaconda or from Python prompt. Use syntax as in line 1 of the pandas library
- open anaconda power shell window and add the following channels along with zipline library. Channels are package managers to host and download python packages (better than pip package manager). Zipline-Reloaded is for Performance Analysis.
- >conda install -c ml4t -c conda-forge -c ranaroussi zipline-reloaded
- conda install pandas pandas-datareader matplotlib
- NumPy/SciPy – For fast, efficient array/matrix calculation
- IPython – For visual interactive development with Python
- matplotlib – For graphical visualization of data
- pandas – For data “wrangling” and time series analysis
- scikit-learn – For machine learning and artificial intelligence algorithms
- Jupyter can run via a network, Securing a notebook server on Win11
- Check the default config file: C:\Users\USERNAME\.jupyter\jupyter_notebook_config.py
- Open python shell and enter: > jupyter notebook –generate-config
- Set password with command: > jupyter notebook password
- Another file jupyter_notrbook_config.json created
6. Getting historical data for the testing model. Getting data from Quandle: Create your account and register for a (free) personal NASDAQ account to obtain an API key. Zipline has built-in functionality to use data from Quandl. You can get a free API key by registering, it will show up in your user profile. Use the key and ingest the default data bundle into zipline.
7. Launch Anaconda PowerShell on Windows, create a directory, and name it to something relevant. We will store and use it for our project. Navigate to the directory created and create a virtual environment as follows:
- Create a Virtual Environment > conda create -n py3.8 python=3.8
- activate environment> conda activate py3.8
Go to Step 2
Leave a Reply